

Blackthorn Captains and Shrine Battle Masters
Blackthorn Captains and Shrine Battle Masters are special encounters found in the game.
Blackthorn Captains are found in the "Town" section of Blackthorn Dungeon.
Shrine Battle Masters are found defending the Virtue Shrines in Publish 107.
The Masters from both encounters are identical and the encounters themselves are very similar.
The terms "Captain" and "Master" are interchangeable in this guide.
The mob type are technically Masters, but are often referred to as Captains.
Table of Contents
Blackthorn Captains
Shrine Battle Masters
Encounter Explanation and Mechanics
Spawn Types
Master Specs and Abilities
Blackthorn Captains
Blackthorn Captains are found in the "Town" section of Blackthorn Dungeon. As of Publish 106, Blackthorn Dungeon has suffered a collapse, which has sealed off many areas. In order to get to the area of the dungeon with Blackthorn Captains, you must acquire 1 Fellowship Coin to gain access to the first teleporter in the dungeon.
Please refer to our Publish 106 guide for more information on the collapse in Blackthorn Dungeon, and how to acquire Fellowship Coins: Publish 106: Forsaken Foes Event Guide
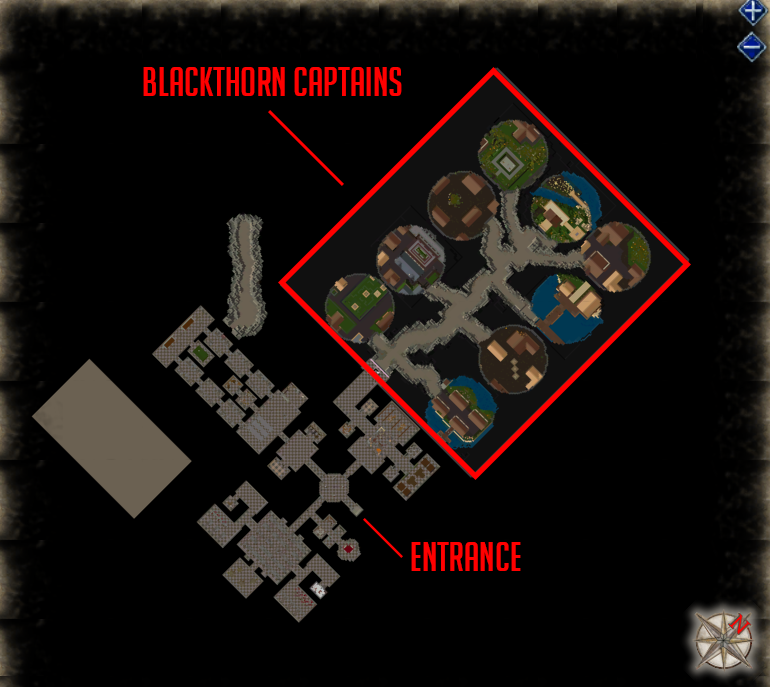
Once inside the marked area, you will notice that each of the "pods" represent a town/city. Only one of these pods will be active at a time, so you may need to do a bit of running to find the one that is active.
An active pod will have a beacon in the middle of it, which is represented by a Lighthouse, and a varying number of spawn roaming around.
Once you defeat enough Captains, the beacon will become vulnerable and allow you to do damage to it. Once enough damage is done, a new phase will begin, at which point more captains will spawn.
There will be 3 phases total to each Pod:
Phase 1 - Fight Captains until the beacon is vulnerable, then damage it until around 72% health.
Phase 2 - Fight Captains until the beacon is vulnerable, then damage it until around 24% health.
Phase 3 - Fight Captains until the beacon is vulnerable, then destroy it.
Once all 3 phases are complete, any captains still alive in the area will despawn and a new pod will activate shortly.
Shrine Battle Masters
Shrine Battle Masters appeared in Publish 107 and as their name implies, they are part of battles that occur at the various Virtue Shrines in Trammel and Felucca.
Shrine Battle Masters will spawn when a Shrine Battle starts. Shrine Battles start when the required number of Mysterious Fragments of the matching Virtue color have been placed on the ground at the appropriate shrine (8 fragments will start a Shrine Battle).
Defeating Shrine Masters is necessary to complete the Jolly Roger Quest and acquire a Tabard of Virtue and Cloak of the Virtuous.
Encounter Explanation and Mechanics
Whether you are doing the Blackthorn Captains or the Shrine Battle Masters , the mechanics of the encounters are the same.
Each Master will initially spawn as Invulnerable and will be surrounded by a spawn that matches a certain theme.

You must defeat the spawn associated with a specific Master before they will become Vulnerable, at which point you can attack them.
You can attempt to drag the spawn away from the Master (or the Master away from the spawn), but be warned that the spawn will occasionally teleport back to the Master. There is a fairly short leash range for the Masters of around ~10 tiles (meaning they will teleport back to their starting location if you drag them too far away).
Spawn Types
Each Master will be linked to their spawn. Their spawn will all fit a common theme (Demon, Elemental, Undead, Fey, etc.). You can determine which spawn belongs to which Master by either looking for the closest pack type surrounding the Master, or by looking at the title of the Master. The Master's title will indicate which spawn they are a Master of:
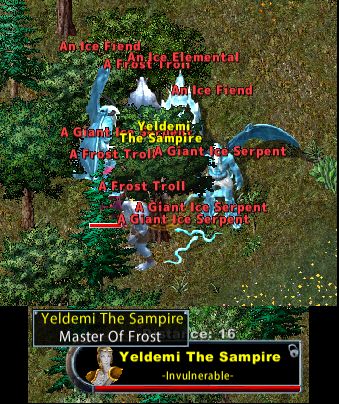
In the above example, you can see the title for the Master is "Master of Frost" and they are surrounded by various Frost/Ice creatures.
Spawns can come in a variety of types:
| Master Type | Mob Types in Spawn |
|---|---|
| Master of Frost | Ice Fiend Ice Elemental Frost Troll Giant Ice Serpent Snow Elemental |
| Master of Arachnids | Giant Black Widow Terathan Warrior Dread Spider Wolf Spider Scorpion |
| Master of Nature | Swamp Tentacle Plague Beast Bogling Treefellow |
| Master of Elementals | Enraged Earth Elemental Water Elemental Fire Elemental Air Elemental Blood Elemental |
| Master of Undead | Mummy Lich Zombie Shade Skeletal Knight Spectre |
| Master of Wildlings | Raging Grizzly Bear Greater Mongbat Dire Wolf Giant Rat Troglodyte |
| Master of Fey | Dryad Cu Sidhe Wisp Satyr Centaur |
| Master of Daemons | Bone Daemon Chaos Daemon Succubus Named Daemons Imp |
| Master of Dragons | Dragon Hydra Reptalon Drake Giant Serpent |
| Master of Orcs | Orc Bomber Orcish Mage Orcish Lord Orc Chopper |
Master Specs and Abilities
In addition to each Master having a spawn type associated with them, they will also spawn in one of two "base" configurations and in a different variety of classes/specializations.
The Masters also have extremely high defensive capabilities, with the warrior build type having extremely high parry as well. Due to this, Hit Lower Defense is essentially mandatory for these encounters if you are a warrior or archer build. Don't leave home without it!
Hit Fatigue and Hit Mana Drain weapons can also be very potent against the Masters. Hit Fatigue against the Melee Masters can keep them stamina-drained and severely reduce their swing speed, making the fight much easier. Hit Mana Drain against the casters to deplete their mana pool -- once they are out of mana, they will do very little spellcasting.
All Masters also take double-damage from elemental spell damage.
Because all spell damage is doubled against the Masters, it gives way to a quirk with Hit Lightning and Hit Harm weapons. If you hit a Master with a weapon imbued with Hit Lightning or Hit Harm, and that Hit Effect procs successfully, you will double your melee damage on that hit (up to your cap), essentially acting as a slayer proc against the Masters. This works with these hit spells because the spell is instant when it procs, doing damage the same time as the melee swing. It does not work with Hit Fireball because the fireball damage is delayed slightly, so the melee damage isn't doubled.
• • • • • • • • • •
Master Configurations
Configuration 1: High Resists / Normal Health
This is the most common configuration for the Masters to spawn in. Their resists will be around ~70-75 and they will have around ~20k health. For this variety Armor Ignore and other debuffs (such as Rune Corruption) work extremely well.
Configuration 2: Low Resists / High Health
This is the other configuration the Masters can spawn in. They will have around 7 in each resist, but have triple hit points (around ~60k hit points). This configuration also tends to have slightly lower defensive capabilities as well (but not always). For this configuration, high damaging spells work great, as well as Double Strike melee attacks.
• • • • • • • • • •
Specializations
Archer
The Archer is a ranged Master that will attempt to kite you around the area. They have a reactive "run around" ability that can trigger when you hit them (like Changelings), which can make it annoying to fight them as you have to keep chasing them.
They will also use the Psychic Attack, Force Arrow, and Paralyzing Blow abilities.
Due to their desire to kite you around the area, I would suggest doing any Archers last to avoid being pulled into additional spawn groups.
• • • • • • • • • •
Assassin
The Assassin is a stealth Master that likes poison and use potions. They will often drop back into hiding/stealth and move around, making it hard to follow them or keep your pets attacking them.
They use Lethal Poison constantly, requiring you to be ready to cure it at all times. They will also regularly throw Greater Conflagration Potions around the area and can Paralyze targets.
They will also cast Poison Breath when surrounded by several people.
In addition, they also have a Corrupted Life Leech aura, which reverses the effects of any Hit Life Leech or Hit Life Drain attacks done to them.
Due to their Corrupted Life Leech aura, it is recommended to kill Assassins with a Tamer, or a Paladin build with healing/chivalry. No matter what you bring, make sure you are on your toes with curing poisons during this fight.
• • • • • • • • • •
Bard
The Bard is one of the easiest Masters to defeat, but can be one of the most annoying as well. They will constantly cast Howl of Cacophony, which is an area-wide -60 SSI, -5 FC, -5 FCR debuff that lasts 30 seconds and forces you to move at walking speed.
The Bard will also regularly cast Peacemaking on a target in the area, preventing them from attacking/casting until it wears off.
The Bard is a fairly straight forward fight otherwise. I suggest having a fast weapon on hand with extra SSI to deal with Cacophony if you are a warrior, and you may need to run a few screens away if you get peace'd, until it wears off. If you fight the bard with a group, chances are you will be able to kill him before his peacemaking becomes a problem.
• • • • • • • • • •
Fencer
The Fencer is the hardest hitting Master, due to them having the ability to use Armor Ignore. In addition to Armor Ignore, the Fencer is also trained in Ninjitsu and will use Mirror Images, Feint, and Death Strike.
They have built-in Life Leech and can use Animal Form when at low health as they attempt to run away.
The Fencer is probably easiest done with a Tamer with a primer 3, but can also be done by various warrior templates. It will definitely require you to stay on your toes and be ready to move away to heal if you get an unlucky miss streak. Mirror Images can also cause your pets to stop attacking the Fencer after they "kill" the image.
• • • • • • • • • •
Macer
The Macer is another extremely hard hitting Master, which also has incredible defense. The Macer will use Crushing Blow and will teleport any player to him that is further than 2 tiles away.
If you fight the Macer on a warrior, be prepared for a lesson in frustration as it is not uncommon to repeatedly miss your attacks due to their high defense. If you fight the Macer as a group, make sure everyone stands within 2 tiles of the Macer, to avoid being pulled into them.
Make sure to stand within 2-tiles of the Macer to not get teleported into him. If fighting in a group, try not to run away if you get aggro. Rely on your group to heal/invis you as needed. If you run away, the macer will then start pulling all other group members to him, which can cause him to switch targets repeatedly, causing a bit of chaos.
• • • • • • • • • •
Mystic
The Mystic is a full spellcaster Master , which specializes in the Mysticism magic school. It will not create Summons, but it uses just about every other ability in the Mysticism arsenal, including Purge Magic and Area Effect spells.
Despite their heavy spellcasting presence, the Mystic is a fairly easy Master to defeat. Make sure to watch your buffs while fighting and re-cast any that get Purged (especially important for a Sampire, who can have Vampiric Embrace purged).
If you fight the Mystic with a tamer, watch out for the Sleep spell they will cast, as it will cause your pet to disengage from combat. Try to stand at max range when fighting the Mystic, as this will keep you out of range of their AoE spells.
• • • • • • • • • •
Necromancer
The Necromancer is another full spellcaster Master , which specializes in the Necromancy magic school. Like the Mystic, it will not use summons or animate dead, and it will not cast forms (Wraith, Lich, Horrific Beast). It does use all other Necromancy spells, including Blood Oath, so be mindful!
The Necromancer has a Corrupted Mana Aura, which will cause you to do damage to yourself whenever you spend mana, so be mindful of your health when casting.
The Necromancer also has a Corrupted Life Leech Aura, which reverses the effects of Hit Life Leech and Hit Life Drain effects. Warriors will need to put away those HLL weapons and turn off Vampiric Embrace for the fight.
The Necromancer also has a reactive debuff that will reduce your swing speed temporarily. There is no debuff icon for this debuff, but you will see a journal message about "Splashes from the creature encrust your weapon and equipment, slowing your movement".
The Necromancer does not hit very hard with melee, but has a lot of magical tricks up their sleeves. Combined with all their Corrupted Auras, it can make it quite annoying to fight.
The Necromancer also has the "Unholy Touch" ability, which will reduce the stats and skill of anyone affected by it. This will reduce 120 skills to 102, making this very dangerous for tamers to try and control their pets while affected by this. The effectiveness of this debuff can be mitigated by Resisting Spells, but even at 120 RS your skill is still reduced to around 108.
• • • • • • • • • •
Rogue
The Rogue is another ranged Master that prefers to fight at range, but will not kite nearly as bad as The Archer. They have Essence of Energy, which deals minor periodic damage in a large area around them. The Rogue also likes to poison targets and will occasionally hide, causing pets to stop attacking.
Overall the Rogue is pretty easy to take down. Watch for sudden aggro changes due to their Essence of Energy AOE and make sure to keep curing their poisons.
• • • • • • • • • •
Sampire
The Sampire is another melee Master, with some interesting personality quirks. They have the same reactive "run around" that the Archer has (like changelings), which doesn't really make sense since they will come back to melee range to keep fighting you.
They will use Chivalry spells, including Enemy of One, Divine Fury, and Consecrate Weapon. They also love to spam Bladeweave, which means they can essentially hit you with any ability.
The Sampire also has Bushido and can be seen using Evasion quite a bit.
They will cast Spirit Speak at low health to try and heal themselves, as well as cast Curse Weapon throughout the fight (which gives them Hit Life Drain).
The Sampire fights in Vampiric Embrace form, which makes it vulnerable to Undead Slayer and weak to fire damage.
The Sampire is probably the easiest of the 4 melee Masters (the others being Macer, Fencer, and Swordsman), but can be quite formidable nonetheless. Watch for sudden changes in aggro due to it running around, and be prepared for burst damage from it's spell/ability combos.
• • • • • • • • • •
Swordsman
The Swordsman is another heavy hitting, high defense melee Master. The Swordsman has Bushido and will cast Counter Attack, Confidence, and Lightning Strike regularly.
They also have the Angry Fire, Searing Wound, and Frenzied Whirlwind abilities.
The Swordsman is often one of the most difficult Masters to fight, due to their extremely high defense (combined with defensive Bushido spells), their Searing Wound ability also reduces the healing you receive while under the duration of it.
Try not to fight within 2 tiles of the Swordsman, as he will be able to hit you with Frenzied Whirlwind, which can also cause him to switch targets to you. If you are a Warrior, be prepared to have to run away and heal if you get an unlucky miss streak.
• • • • • • • • • •
Wizard
The Wizard is another full spellcaster Master that specializes in the Magery magic school. They cast a full variety of Magery spells and can dish out some decent burst damage. They also have the Meteor ability (like Virtuebane) that drops on the area, doing massive area damage, knocking characters back, stunning and dismounting them.
The Wizard is fairly easy to dispatch. Make sure you watch for when they yell "You will burn to a pile of ash!", as they will drop their Meteor spell shortly after and be prepared to heal and burst damage from spells.